
I am constantly amazed at the lack of CD tweaking in the high-end community. No one would dare play a record without the appropriate mat, clamp, cleaning the stylus, cleaning the record, setting the azimuth, overhang, tracking force and vertical tracking angle. Yet these same audiophiles take a new CD, stick it in a player and play it, as if that is all there is to do to get what’s on the disc. Every once in a while you read in a magazine that some reviewer greens the edges of the CD or maybe uses the Bidini Clarifier. That’s about it!!!!! It’s no wonder that lots of audiophiles think CDs can’t produce nowhere near record quality sound. The fact of the matter is that a properly tweaked CD playback system can produce very fantastic sound. CD tweaking is very overlooked because the digital information is thought by many to be very simple to decode. Nothing could be farther from the truth. Everything you do to a CD will change the sound, no matter how low of electrical jitter there is down stream. All the things I am suggesting you do are clearly audible on even low end systems (boom boxes). If you don’t hear a difference, maybe you don’t want to. The laser is an incredibly powerful light. Any splashing or messing with its beam and you have audible problems. The DVD players that I have played with are far more sensitive. Probably because of the stronger laser beam and the smaller pits. The things I suggest you try are as follows:
-
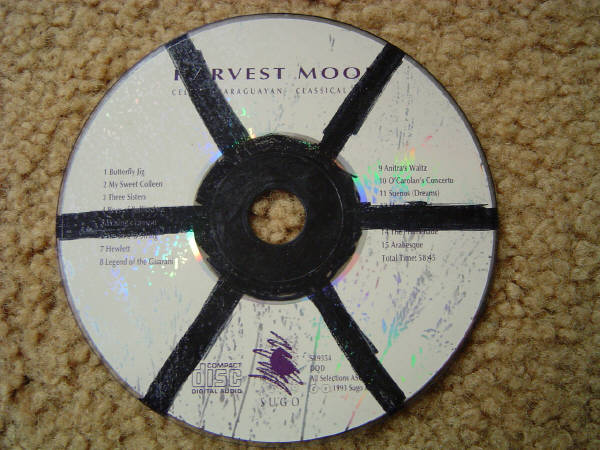
1. Lightly sand the outer and inner edge of the CD with sand paper (240 grit works fine) to remove the shine. This roughing of the edges stops a great deal of the laser reflections. This results in a more musical, natural and detailed playback.
2. Blacken the edges you just sanded with an opaque flat black paint marker (Uni Posca brand works great) and also blacken the top and bottom of the CD around the center hole where it is clear. Make sure you color into any centering grooves or hills. Because the laser is red everyone used to assume that you have to use a green marker to absorb the red light. Black absorbs all colors and works very effectively. You want to use a marker that is opaque, doesn’t come off on your fingers and also does not peel off.
3. Make 6 black lines on top of the CD a little less than one quarter inch wide. These lines run from the center of the CD to the edge (you are dividing the CD into six pieces of pie). You can still read the label with these lines. I got this idea from the Marigo Crossbow mat with it’s three wider lines. The spinning black lines really make a difference. You might experiment with other amounts of lines (3-8). Let me know what you think. More lines might work better or worse with the faster spinning DVD’s. You can also blacken the whole top of the CD but then you cannot read the label....(however, you can write the title with a white marker over the black). Blacking the entire top gives the best sound.
4. Apply the latest optical treatment to the playing side and the top of the CD. My latest favorite is Ultrabit Platinum Plus.......he is suppose to have an even better version now.
5. Remove static on the CD/SACD/DVD by using the Mapleshade Iconoclast (now dicontinued) or other destaticer like the Zerostat. You must zap or treat the disc every time you play it. The difference is quite startling. However, the effect lasts only about 7 minutes as the spinning CD creates static very fast. I do it every time I REALLY want to hear live music in the room.
6. Use Herbies Super Black hole CD mat.....very nice improvement.
We do numbers one through six on every CD/SACD/DAD/DVD-A we listen to.
7. Demagnetize the CD with a bulk eraser, one of the audiophile demagnetizers or the Walker Talisman. Works great but you must do this every time you play......again, the effects last maybe 7 minutes.So what do you get when you do most of the above inexpensive tweaks? Way more musical, natural and detailed sound, that’s all!!!
updated 9-21-2018